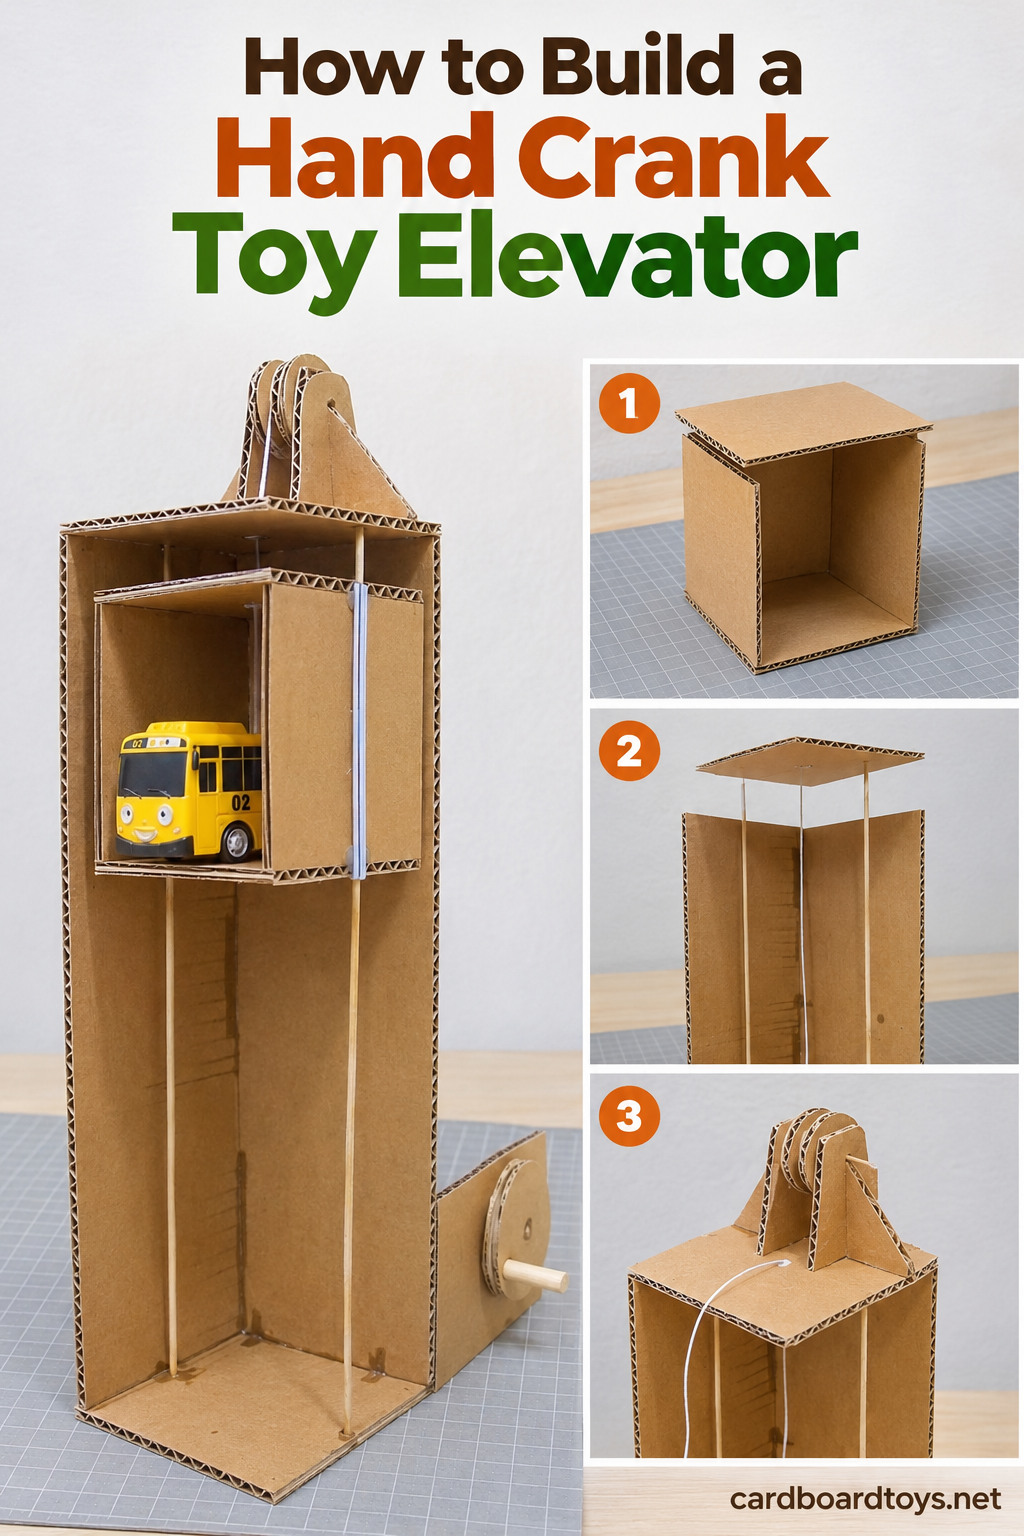

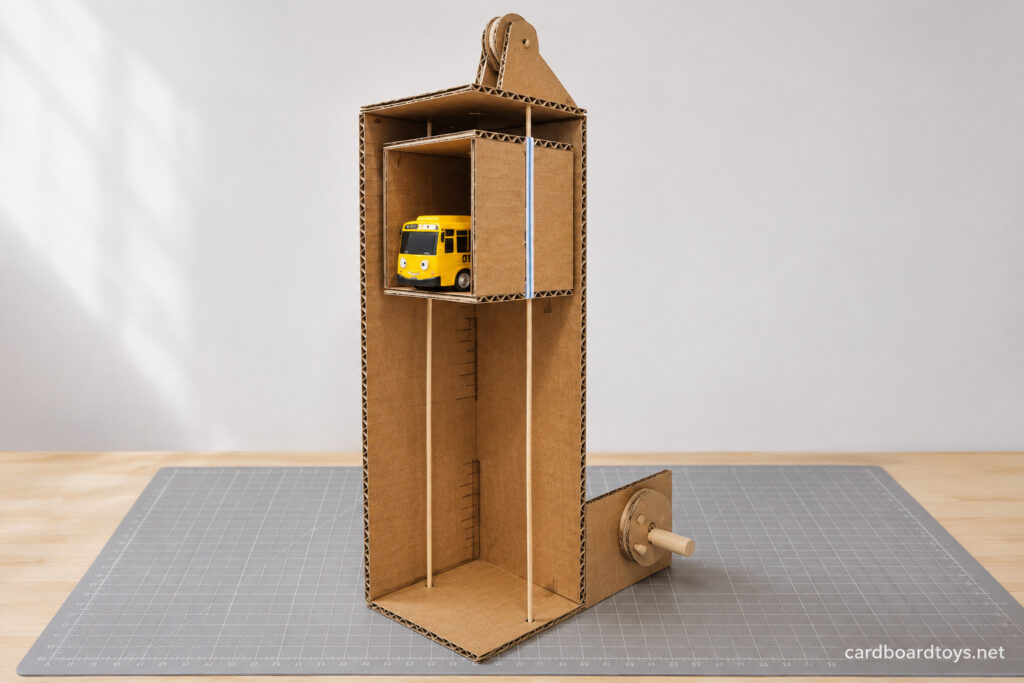
This tower has a real working lift. Wind the handle at the bottom and a small cardboard car rises up the shaft with a toy passenger inside. Wind it back and the car comes down again. There are no batteries and no motor, just a string, a pulley you make from cardboard circles and two bamboo rails that keep the car on track.
Everything comes from one shipping box and a few things from the kitchen drawer. The finished tower is about 14 inches tall.
A Toy That Grows Into Other Games
Children usually begin by giving rides to their smallest cars and figures. Soon the elevator becomes part of a bigger story: a car park, a fire station lookout, a lift in a mine. It sits nicely next to a cardboard house or a block city.
It also shows three simple machines doing real work. The handle turns an axle that winds up the string. The wheel at the top changes the pull from down to up. The rails stop the car from swinging. Kids can watch each part move, which makes it easy to explain how a small hand can lift a load.
Skill, Time and Age
- Skill level: medium. The boxes are easy. The rails, holes and string all have to line up for a smooth ride.
- Time: about 2 hours with glue cooling.
- Age: 6 and up can glue panels, thread the string and test the lift. The knife, hole poking and hot glue belong to an adult.
Safety first: skewer points are sharp, so snip off any tip that ends up sticking out of the toy. Use a cutting mat or a thick board under the craft knife and keep fingers away from the glue nozzle.
Tools
- Craft knife with a cap
- Sturdy scissors
- Metal ruler
- Compass and pencil
- Mini glue gun
- Black marker for doors, if desired
2026 Prices
- 1 reused medium shipping box $0.00
- 4 bamboo skewers, about 12 in. long $0.31
- 1 plastic drinking straw $0.02
- About 3 ft. of thin cotton string $0.04
- About 3 mini hot glue sticks $0.37
- 1 toy passenger from the toy box, less than 2½ in. wide $0.00
Total $0.74
How to Build the Elevator
Step 1: Cut the Tower Pieces
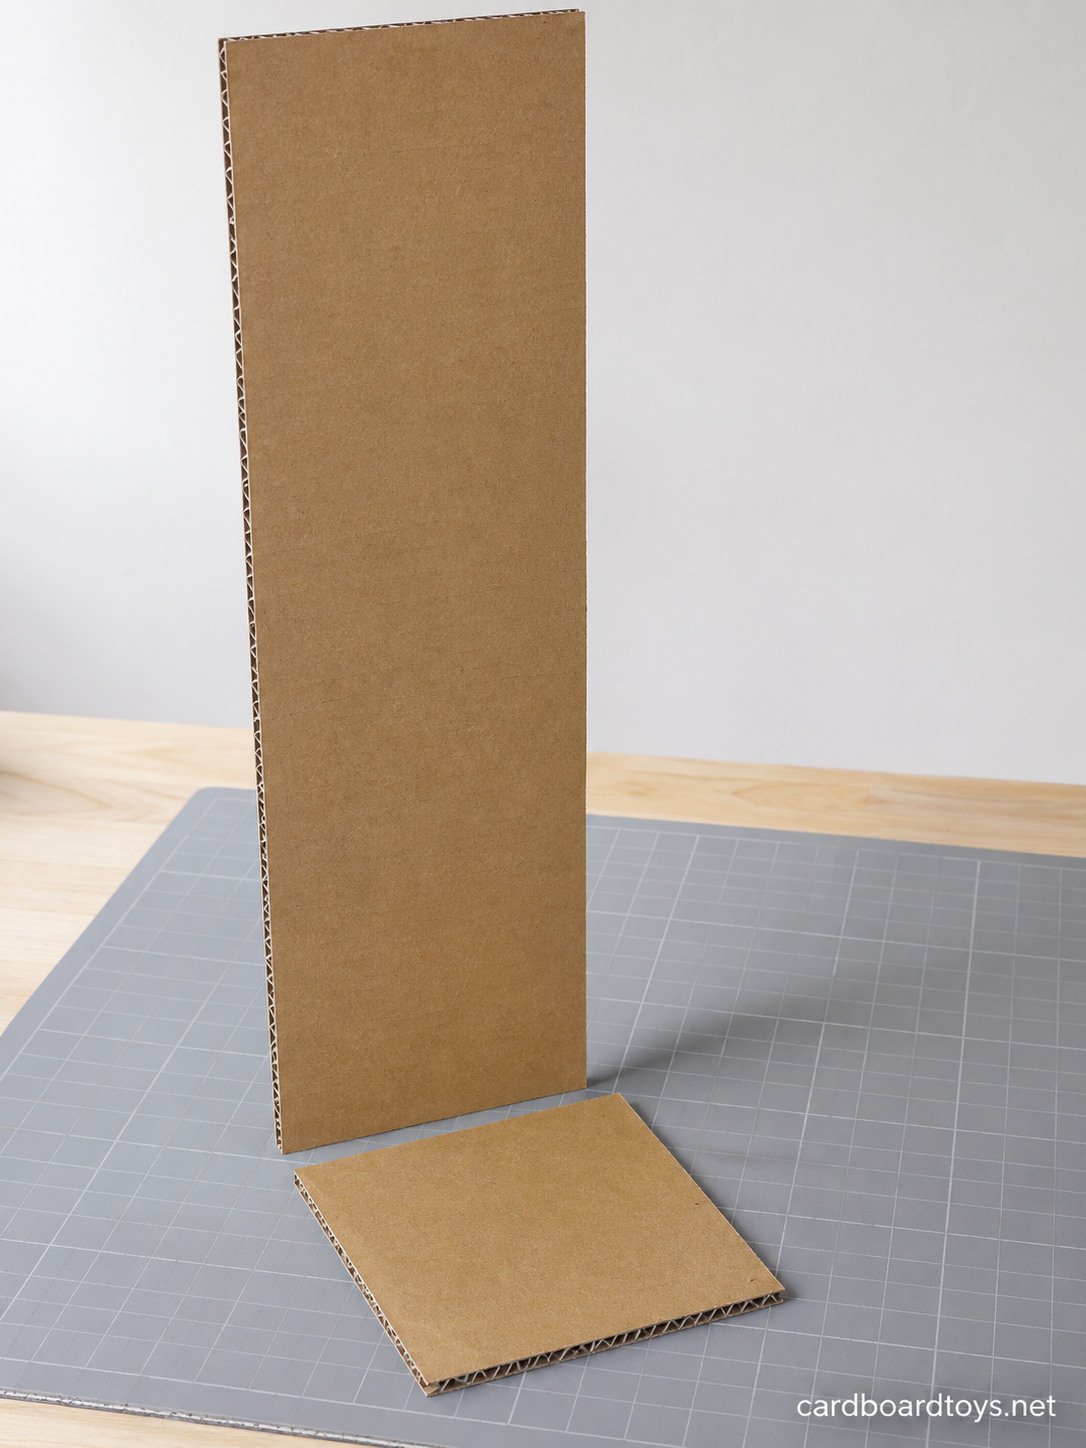
Cut two squares 4 x 4 inches (10 x 10 cm). One is the tower floor and one is the tower roof. Then cut two tall walls, each 4 inches wide and 12 inches high (10 x 30 cm).
For the walls, make sure the lines inside the cardboard run from top to bottom. The walls stay stiff that way and the tower will not bend. Draw the knife along the ruler several times lightly instead of pressing hard once.
Step 2: Glue Two Walls Into a Corner
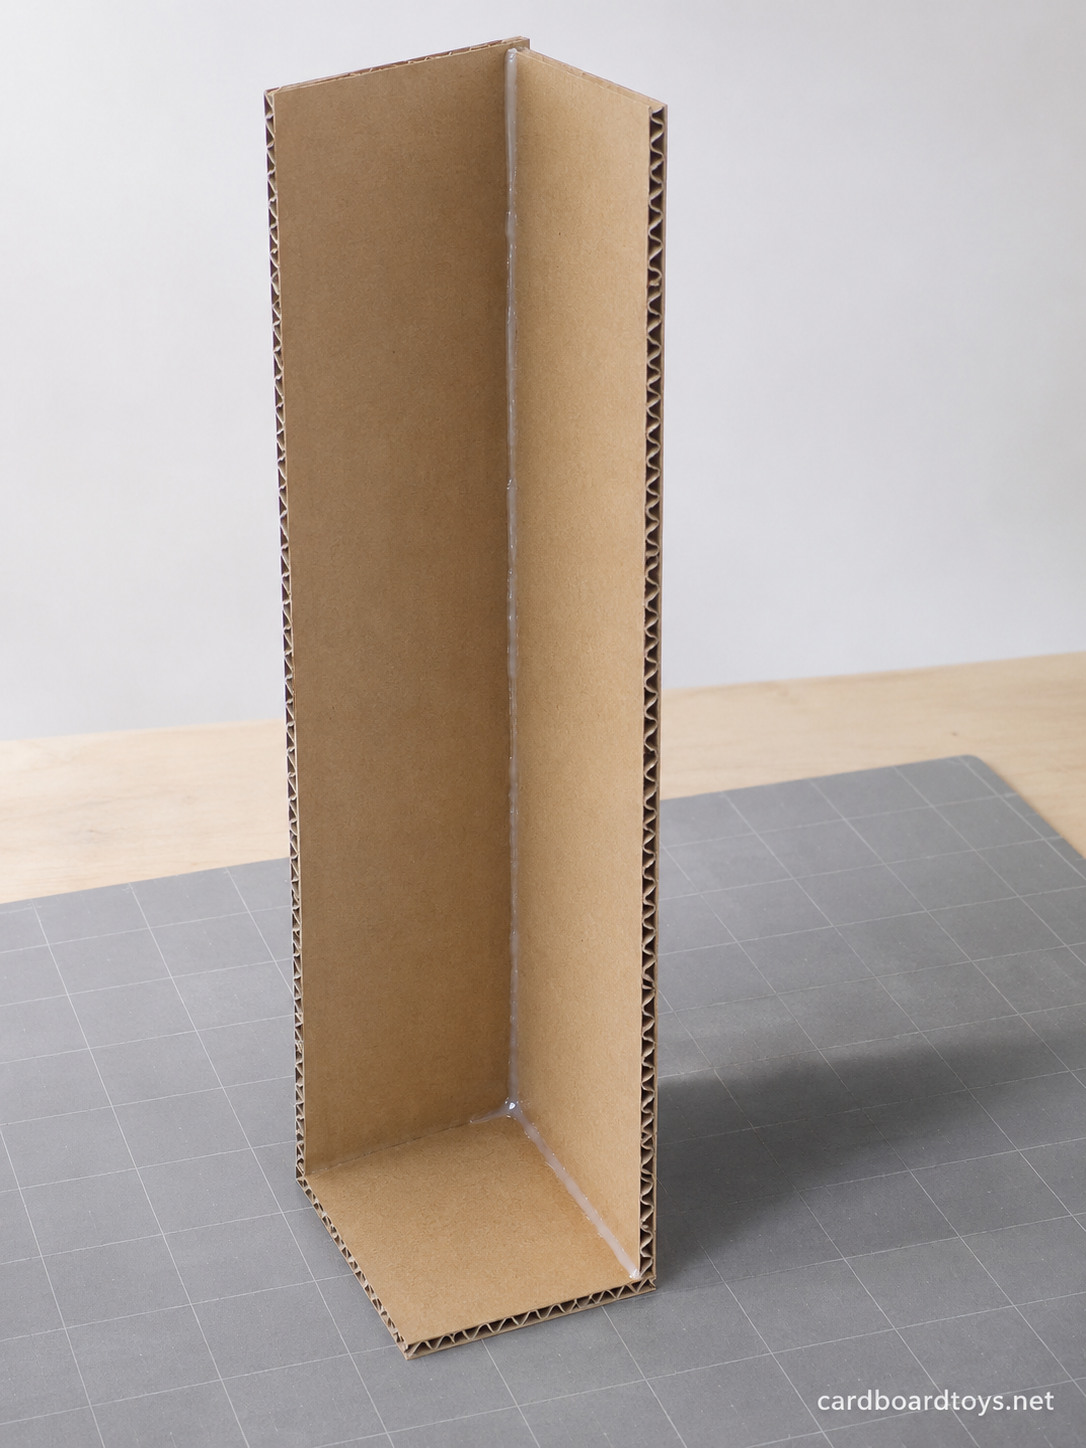
Glue the bottom of one wall along the back edge of the floor. Glue the second wall along a side edge of the floor so it meets the first wall and forms a tight corner. Add a line of glue down the inside of that corner for strength.
You now have two walls standing on a floor, with the front and the other side open. That open side is how you will see the car and put toys inside.
Step 3: Make the Car
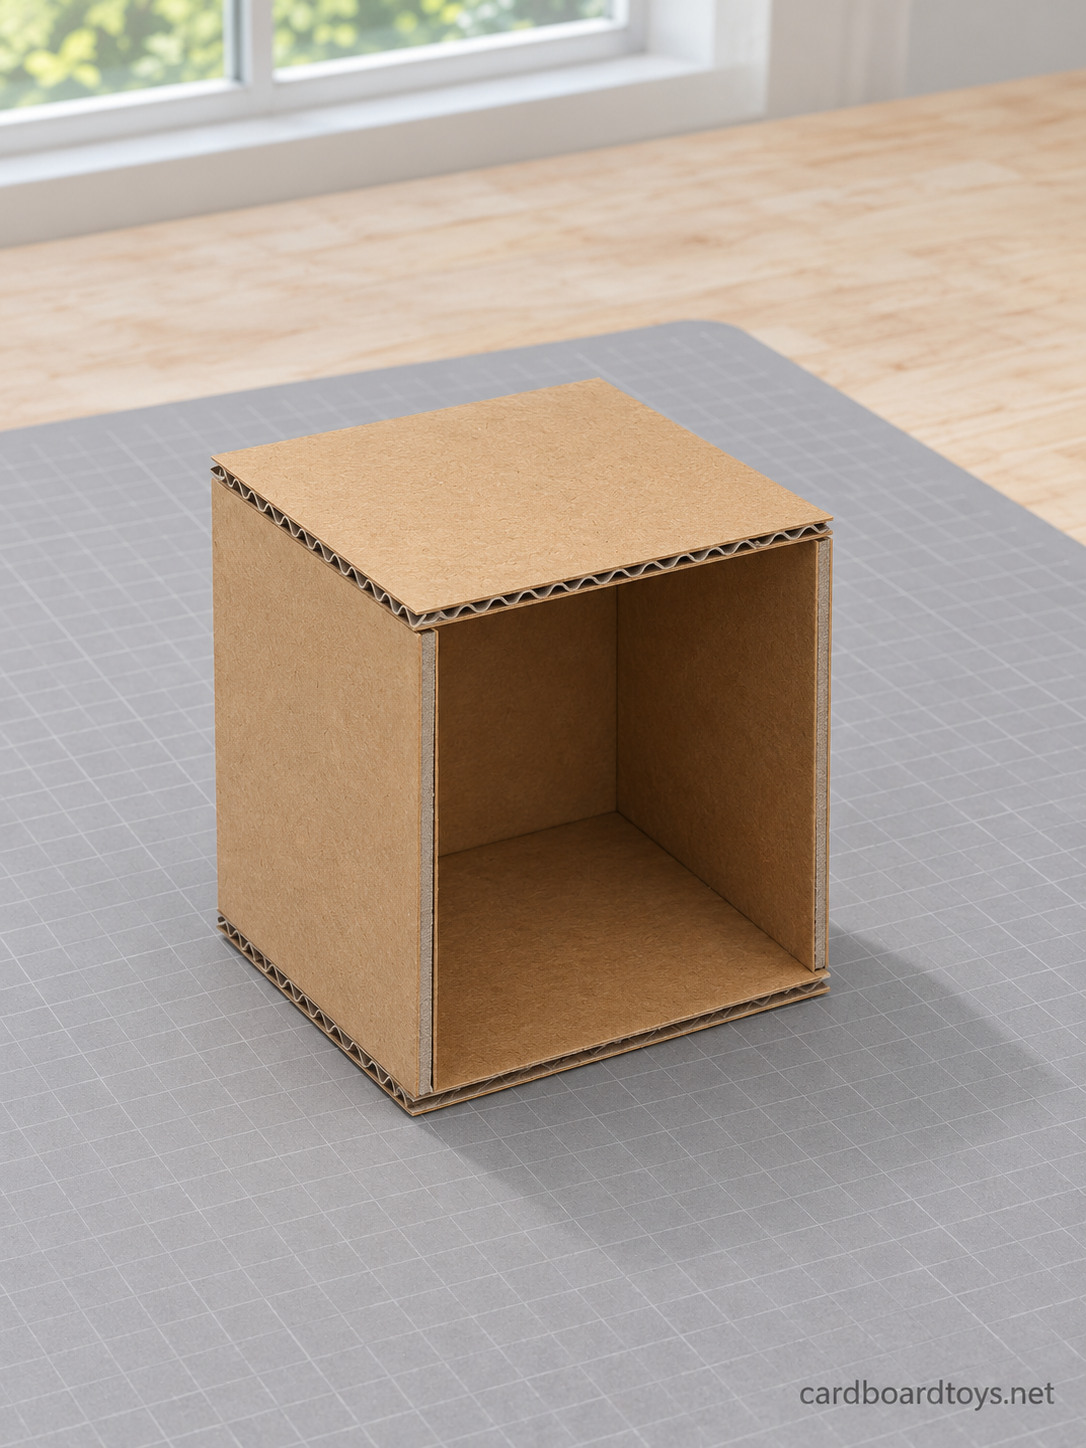
Cut five squares 3 x 3 inches (7.5 x 7.5 cm). Use one as the car floor. Glue on a back wall, then one wall on each side, then the roof. Leave the front open as a door.
Try your toy inside before the glue hardens. It should slide in easily. Also check that the car will have about half an inch of space on every side once it is inside the tower.
Step 4: Add the Straw Guide
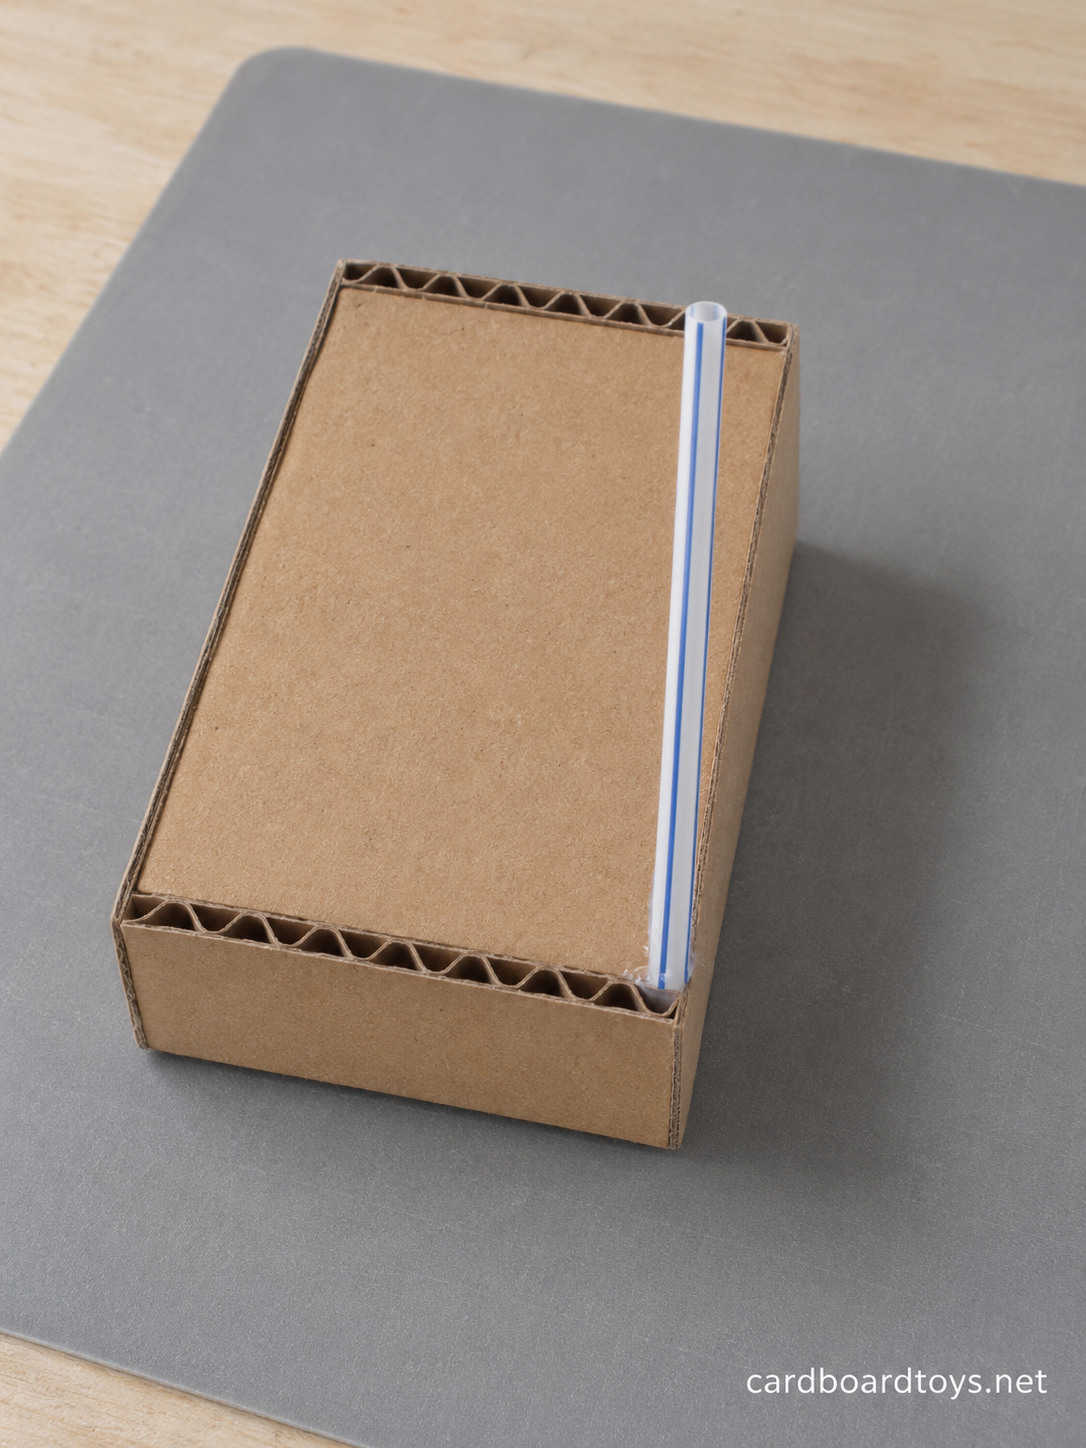
Cut a 3 inch piece from the straight part of the straw, the same height as the car. Glue it standing up on the outside of one side wall, close to the front edge. One rail will run through this straw, so keep it straight and do not let glue get inside.
Step 5: Poke Holes in the Car
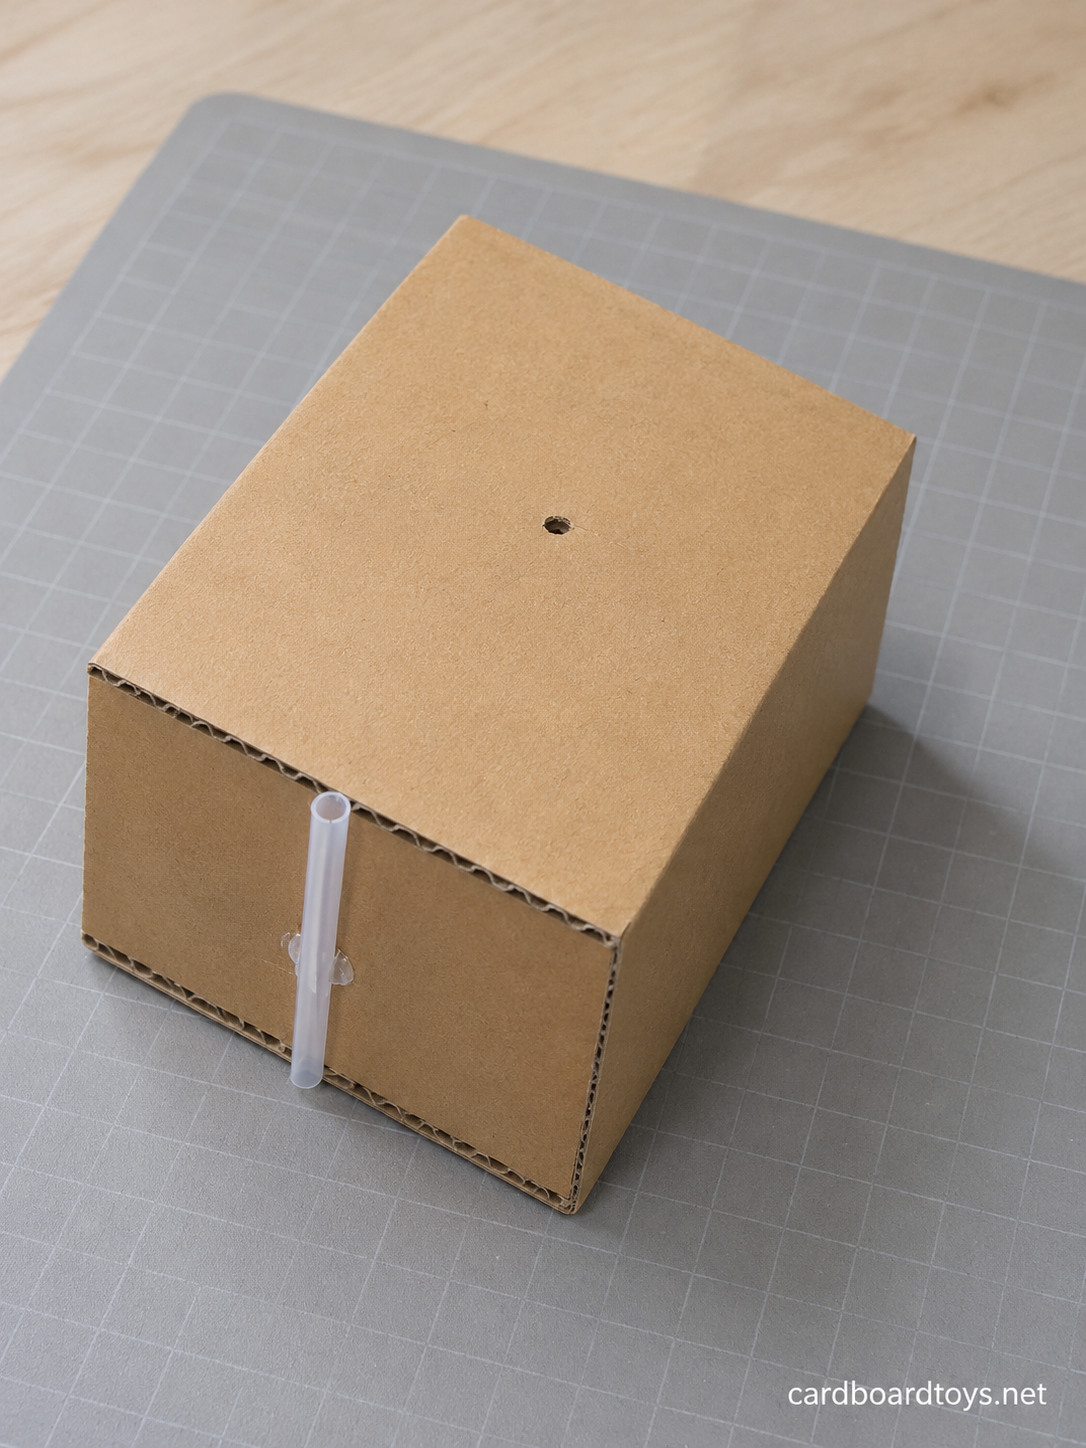
Make one small hole in the middle of the car roof. The string will go here. Then make a hole in the roof and another in the floor at the back corner on the opposite side from the straw. These two holes must sit exactly above each other, because the second rail passes through both.
Test with a loose skewer. It should slide through the straw and through both corner holes without catching. Twist the skewer in any hole that feels tight.
Step 6: Fix the Rails to the Floor
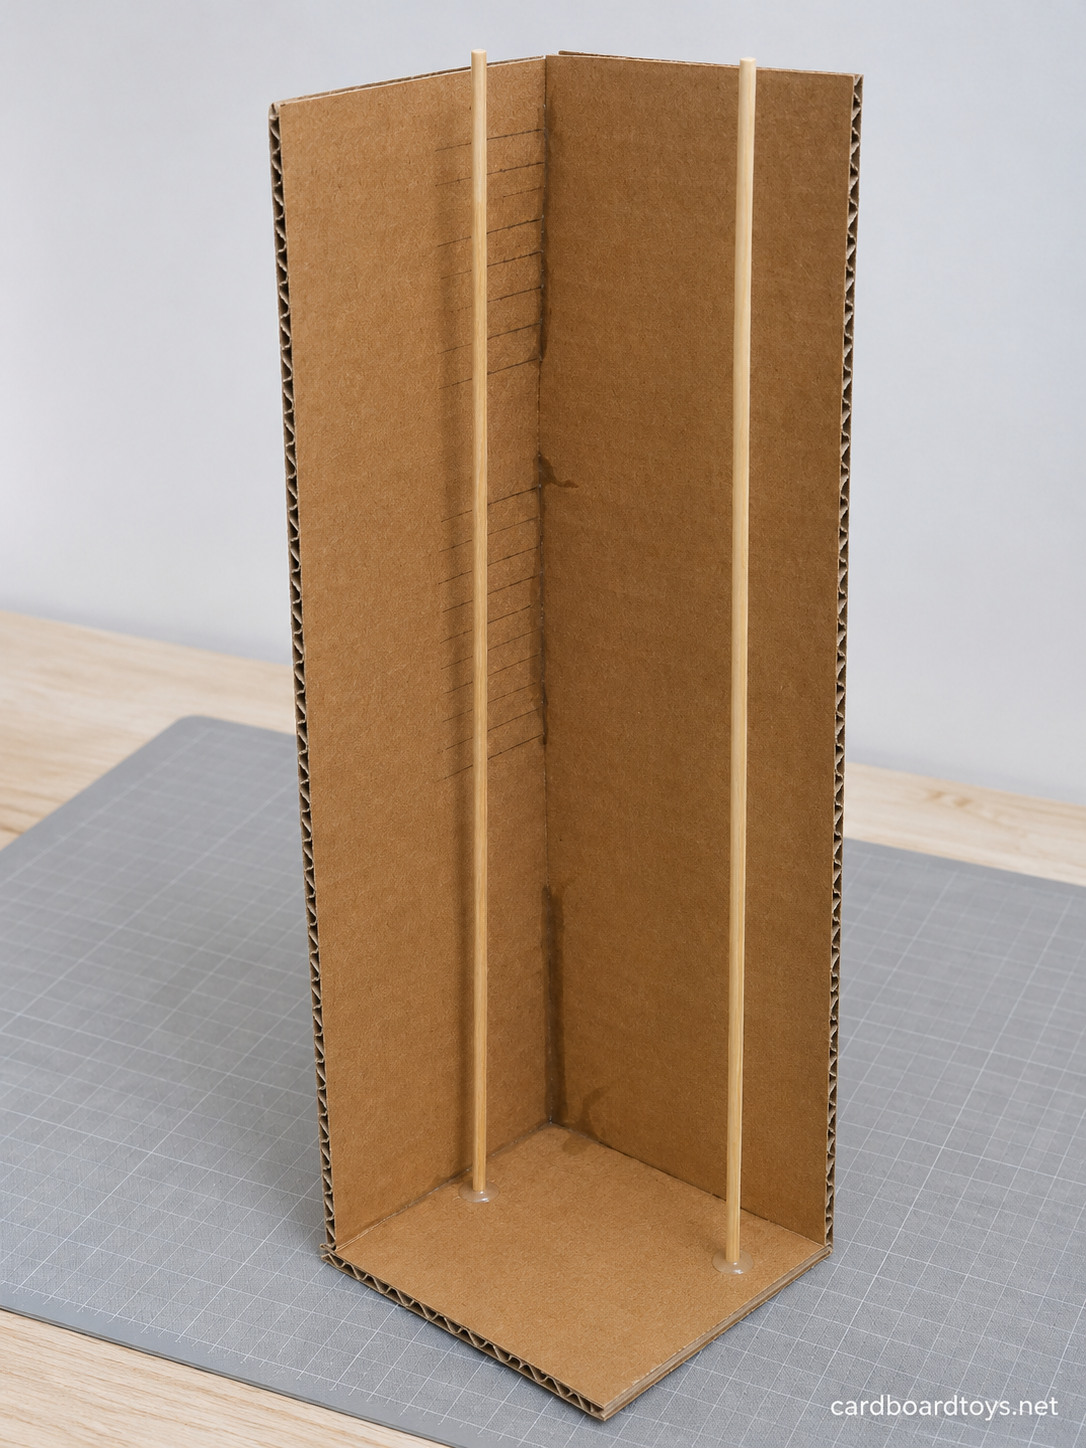
Place the car inside the tower where it will travel, about half an inch from each wall. Mark the tower floor through the straw and through the corner hole. Take the car out, push a skewer blunt end down into each mark, add a drop of glue around its base and hold it upright until it sets.
Look at both rails from the front and from the side. They have to be parallel. Even a small lean will make the car jam halfway up.
Step 7: Put the Car on the Rails
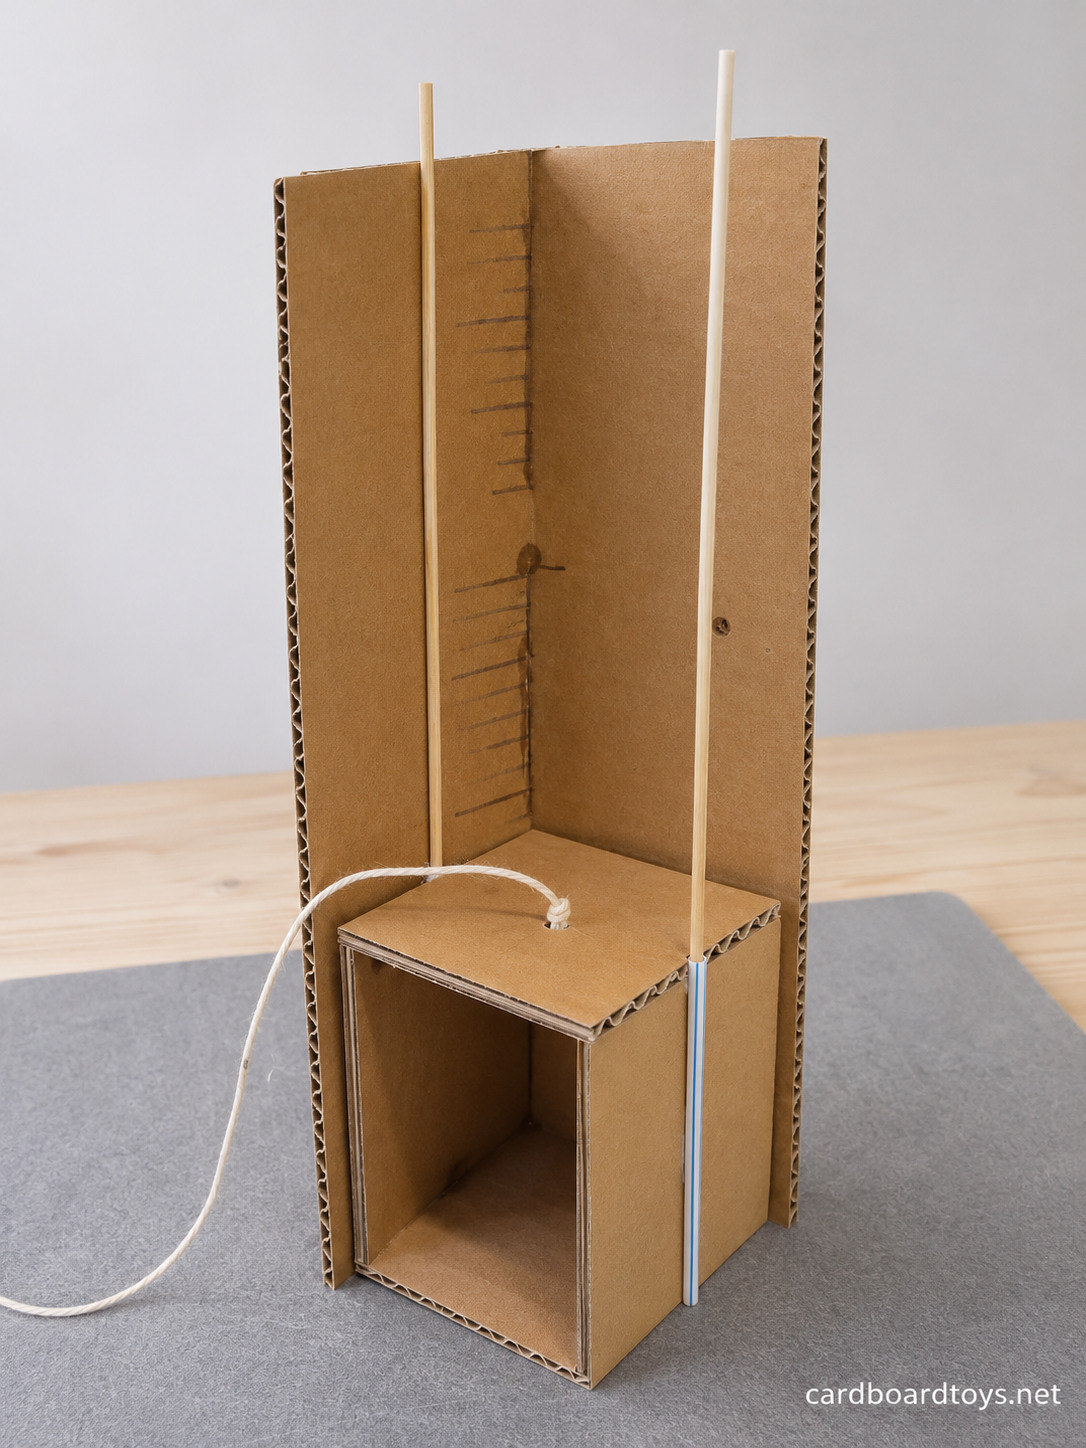
Slide the car down over the rails, one through the straw and one through the corner holes. Move it up and down a few times. Then push one end of the string down through the center hole in the roof and tie a big knot below it so it cannot slip out. Leave the rest of the string long.
Step 8: Glue on the Tower Roof
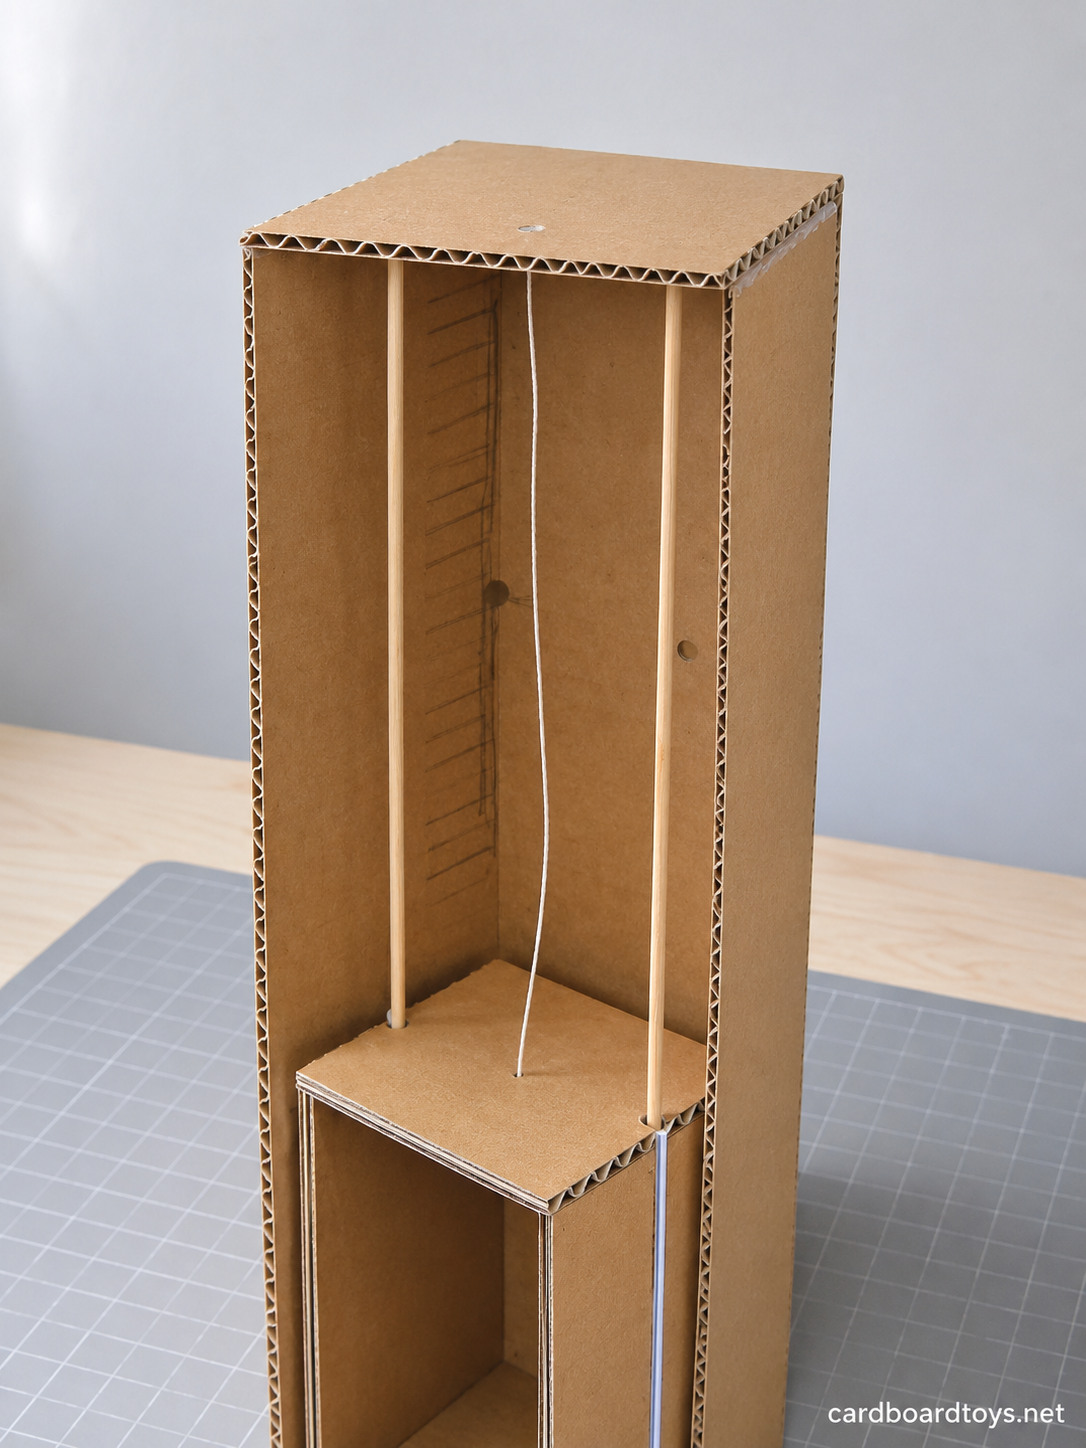
Poke three holes in the roof square: two above the rail tops and one in the center for the string. Pass the string up through the center hole, guide the rail tips into their holes and glue the roof onto the walls. Both rails are now held at the top and bottom.
Step 9: Make the Pulley
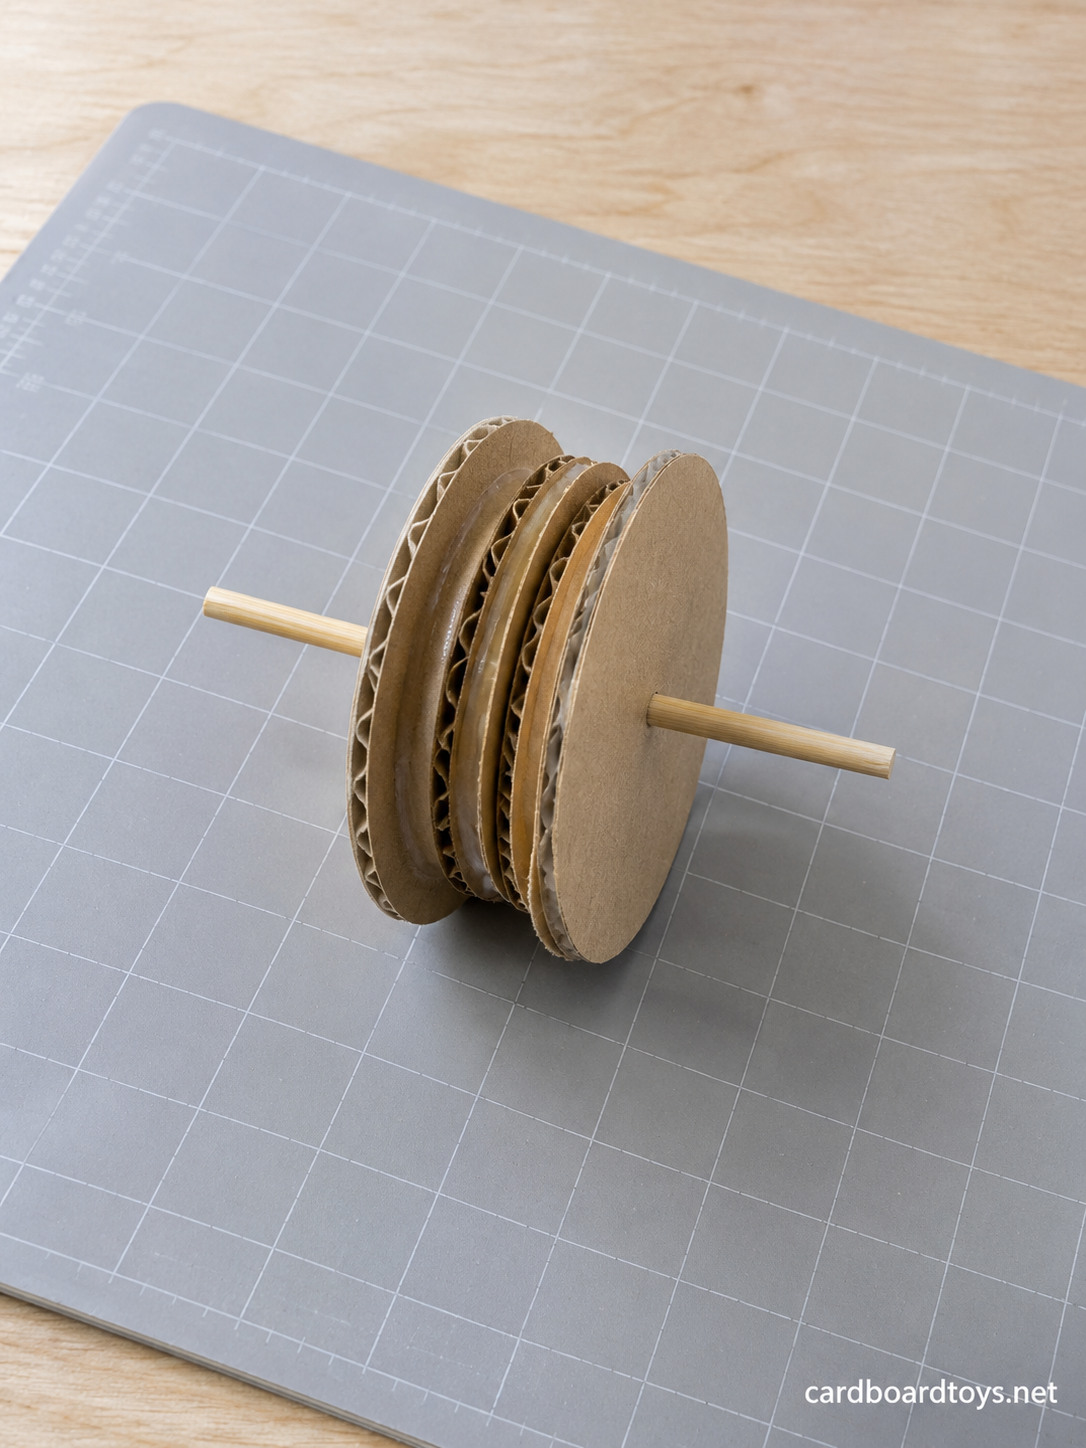
Draw and cut two circles about 1 3/4 inches (4.5 cm) wide and three smaller circles about 1 1/4 inches (3 cm) wide. On a 3 inch piece of skewer, stack one big circle, the three small ones, then the second big one.
Glue the stack together. The small circles in the middle make a groove between the two big ones, and the string will sit in that groove. Spin it to check that the whole wheel turns together.
Step 10: Mount the Pulley on the Roof
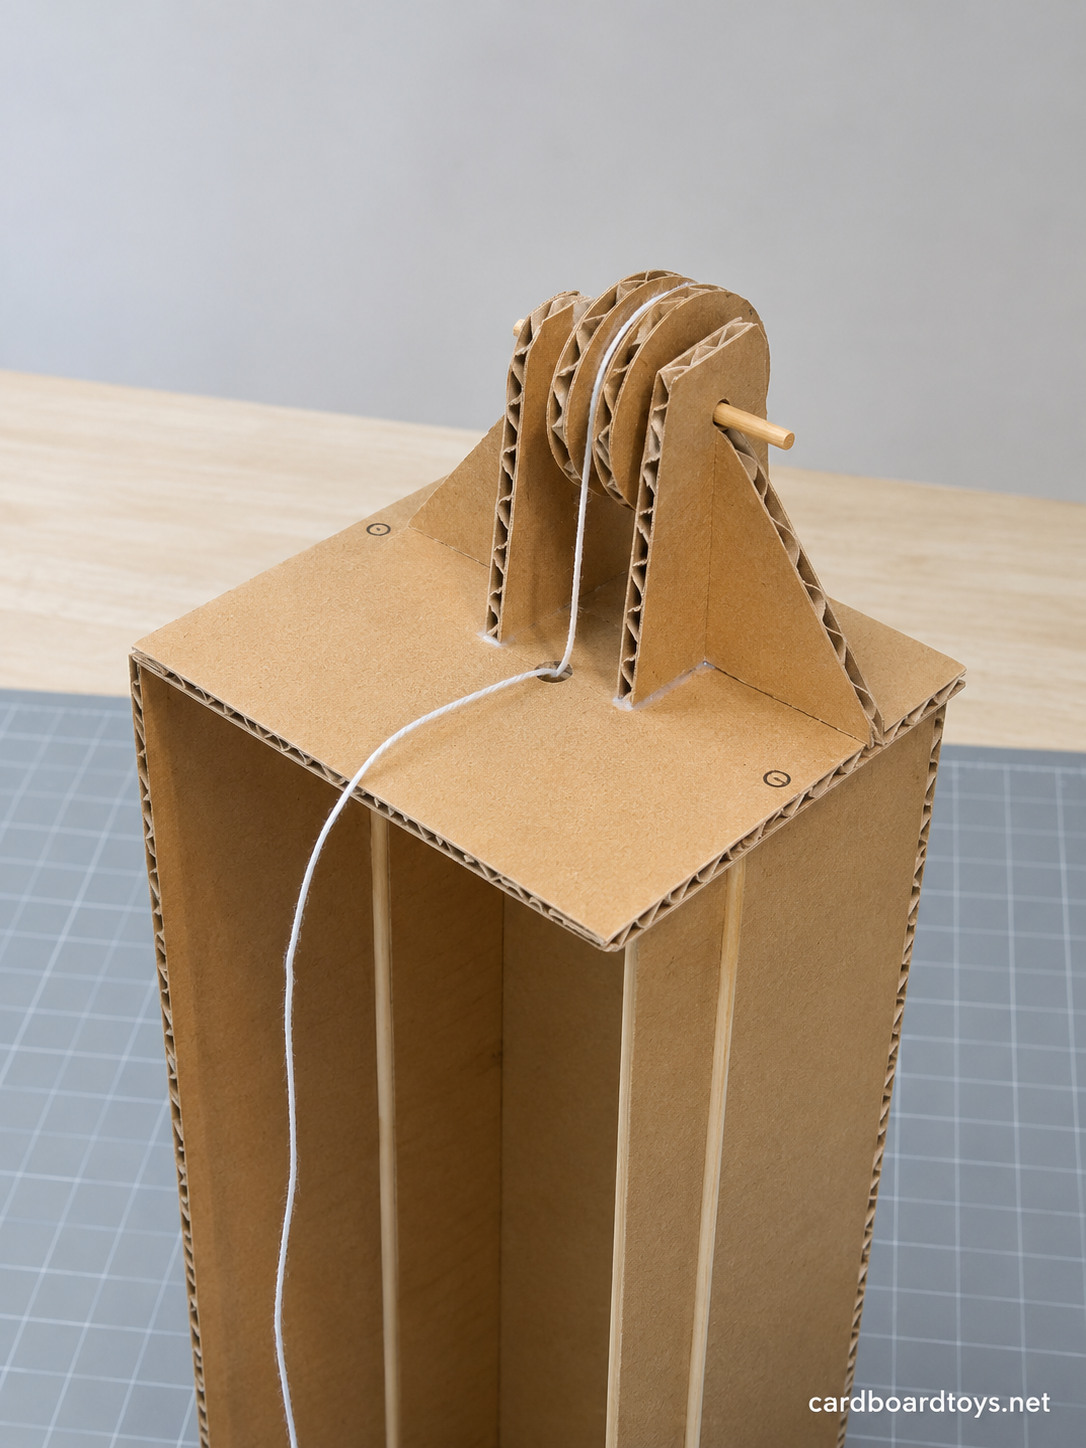
Cut two cardboard triangles about 2 1/4 inches (6 cm) wide and tall, and poke a hole near the point of each. Glue them upright on the roof, facing each other on either side of the string hole, with just enough room for the pulley between them.
Push the pulley axle through one triangle, the pulley and the other triangle. Lay the string in the groove and let the loose end hang down the outside of the tower.
Step 11: Build the Handle Box
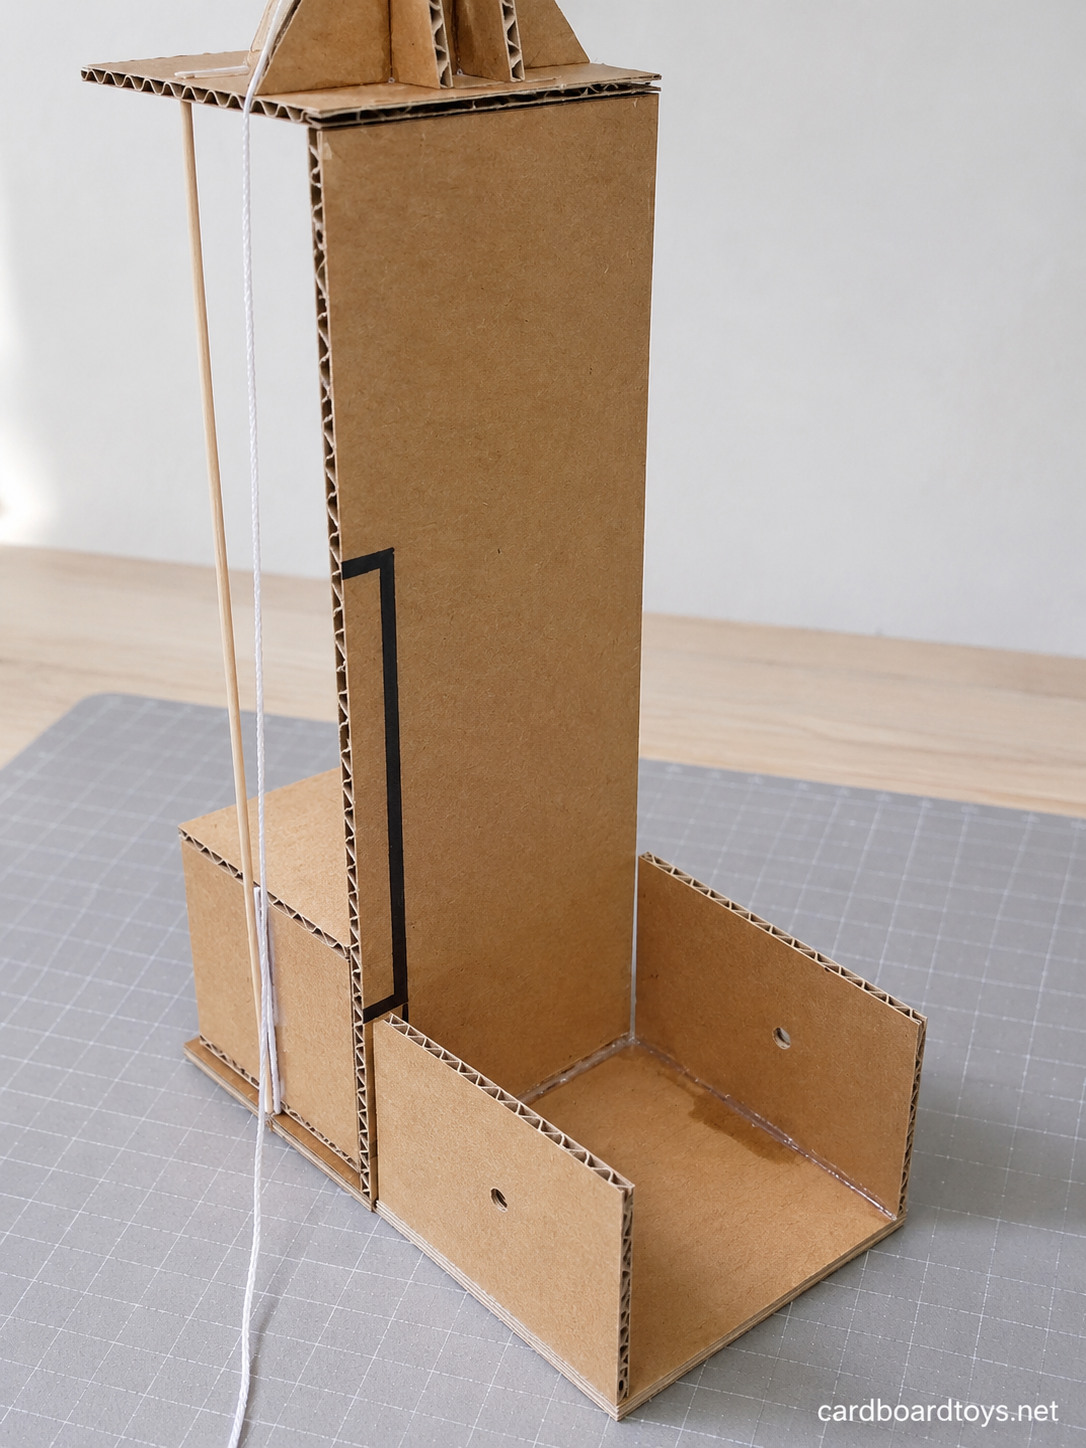
At the base of the tower, on the side where the string hangs, glue a small base about 3 1/2 x 2 3/4 inches (9 x 7 cm) against the tower. Stand a side panel about 2 1/2 inches (6 cm) tall on each short edge of this base, facing each other.
Poke a hole in each side panel at the same height. Hold a skewer through both before the glue cools to make sure it goes straight across.
Step 12: Fit the Axle and Handle
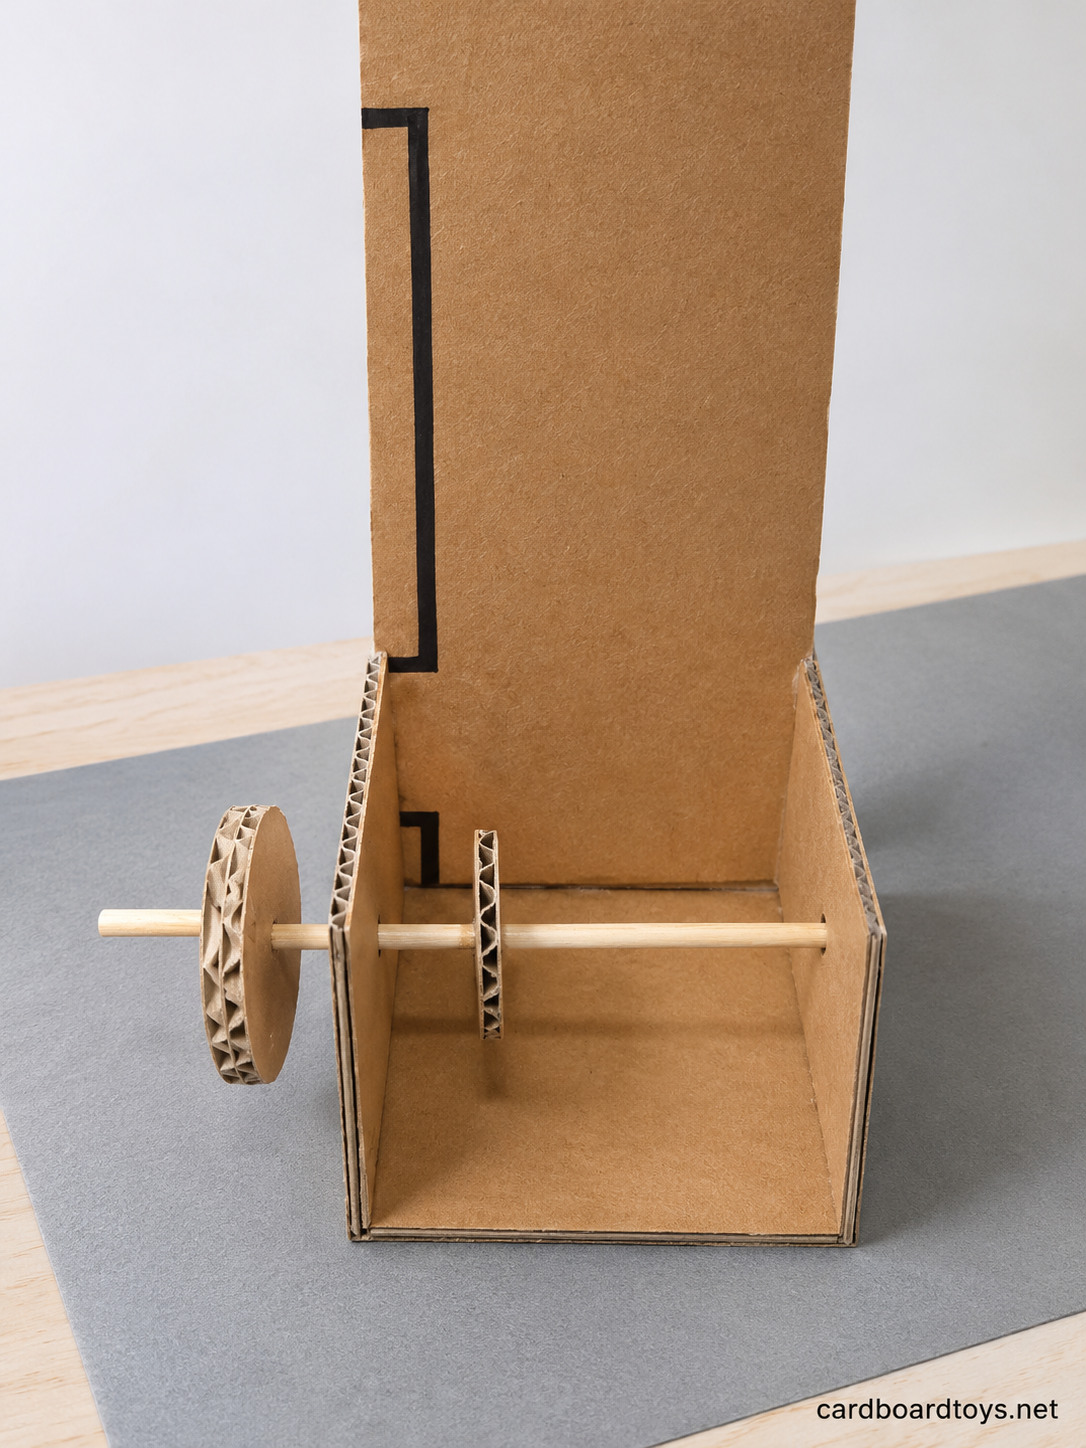
Cut a 1 1/2 inch (4 cm) circle and a 2 inch (5 cm) circle and poke a hole in the center of each. Push a skewer through one side panel, the small circle and the other panel. Glue the small circle to the skewer just inside one wall. It stops the string from sliding along the axle.
Push the big circle onto the end of the skewer outside the box and glue it. This is the crank wheel. Glue a 1 1/4 inch piece of skewer into its face near the edge to make the handle.
Step 13: Attach the String to the Axle
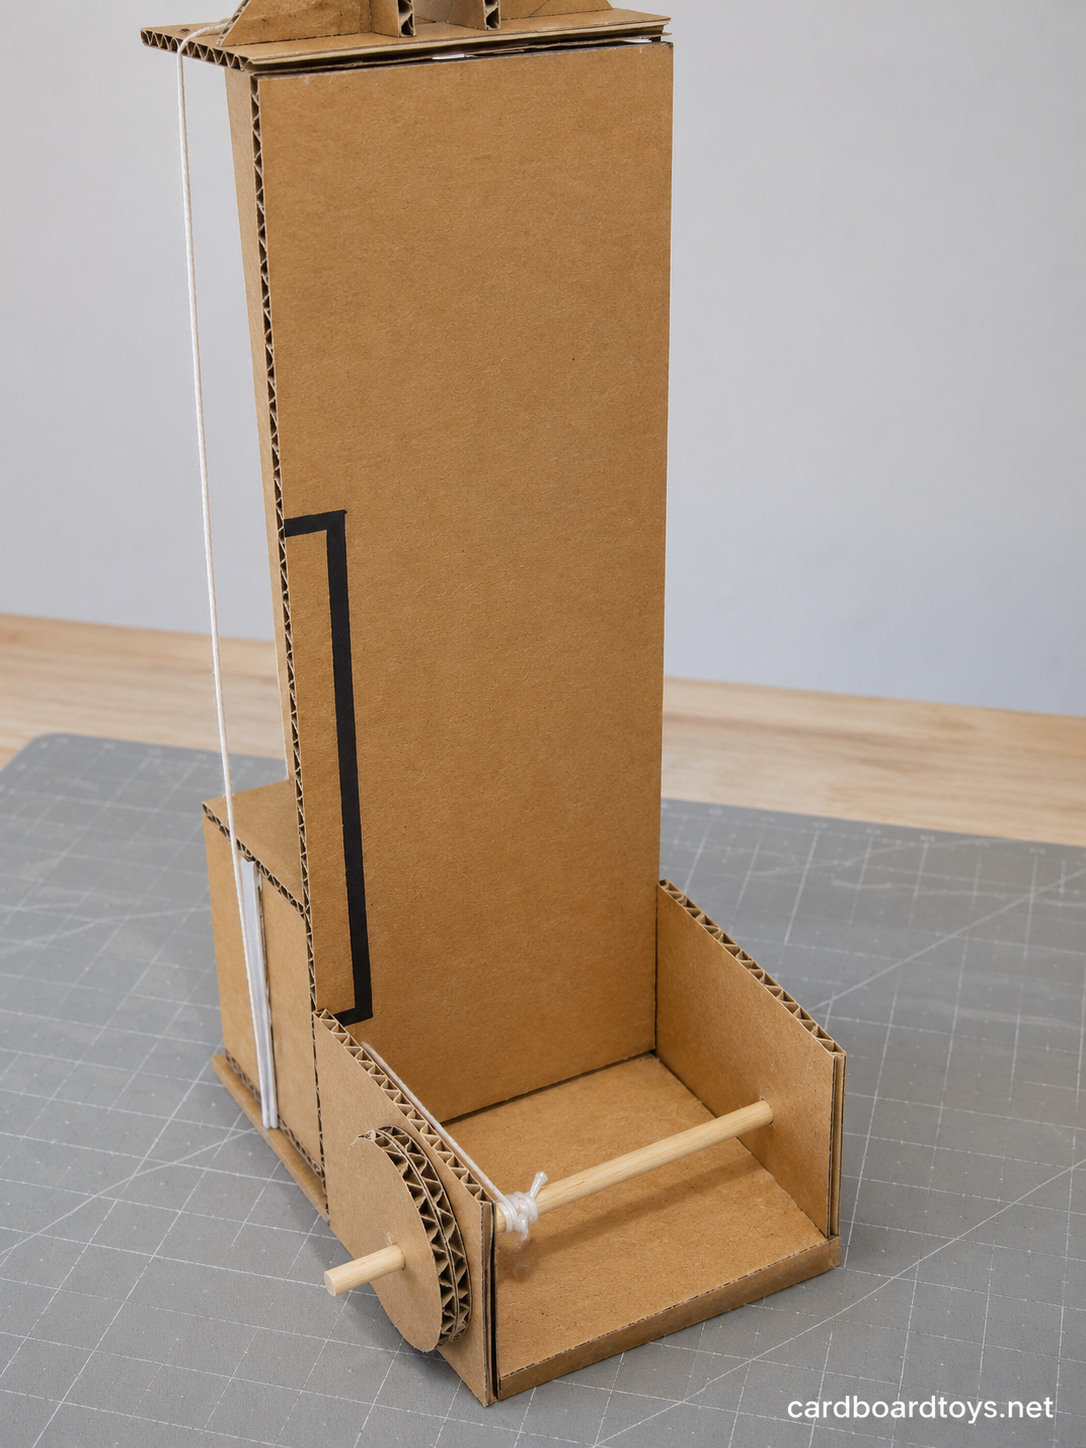
Let the car sit on the tower floor. Pull the loose string tight, wrap it twice around the axle beside the small circle and tie a knot. A drop of glue on the knot keeps it from slipping.
Cut off any skewer points that stick out here or on top of the tower.
Step 14: Take It for a Ride
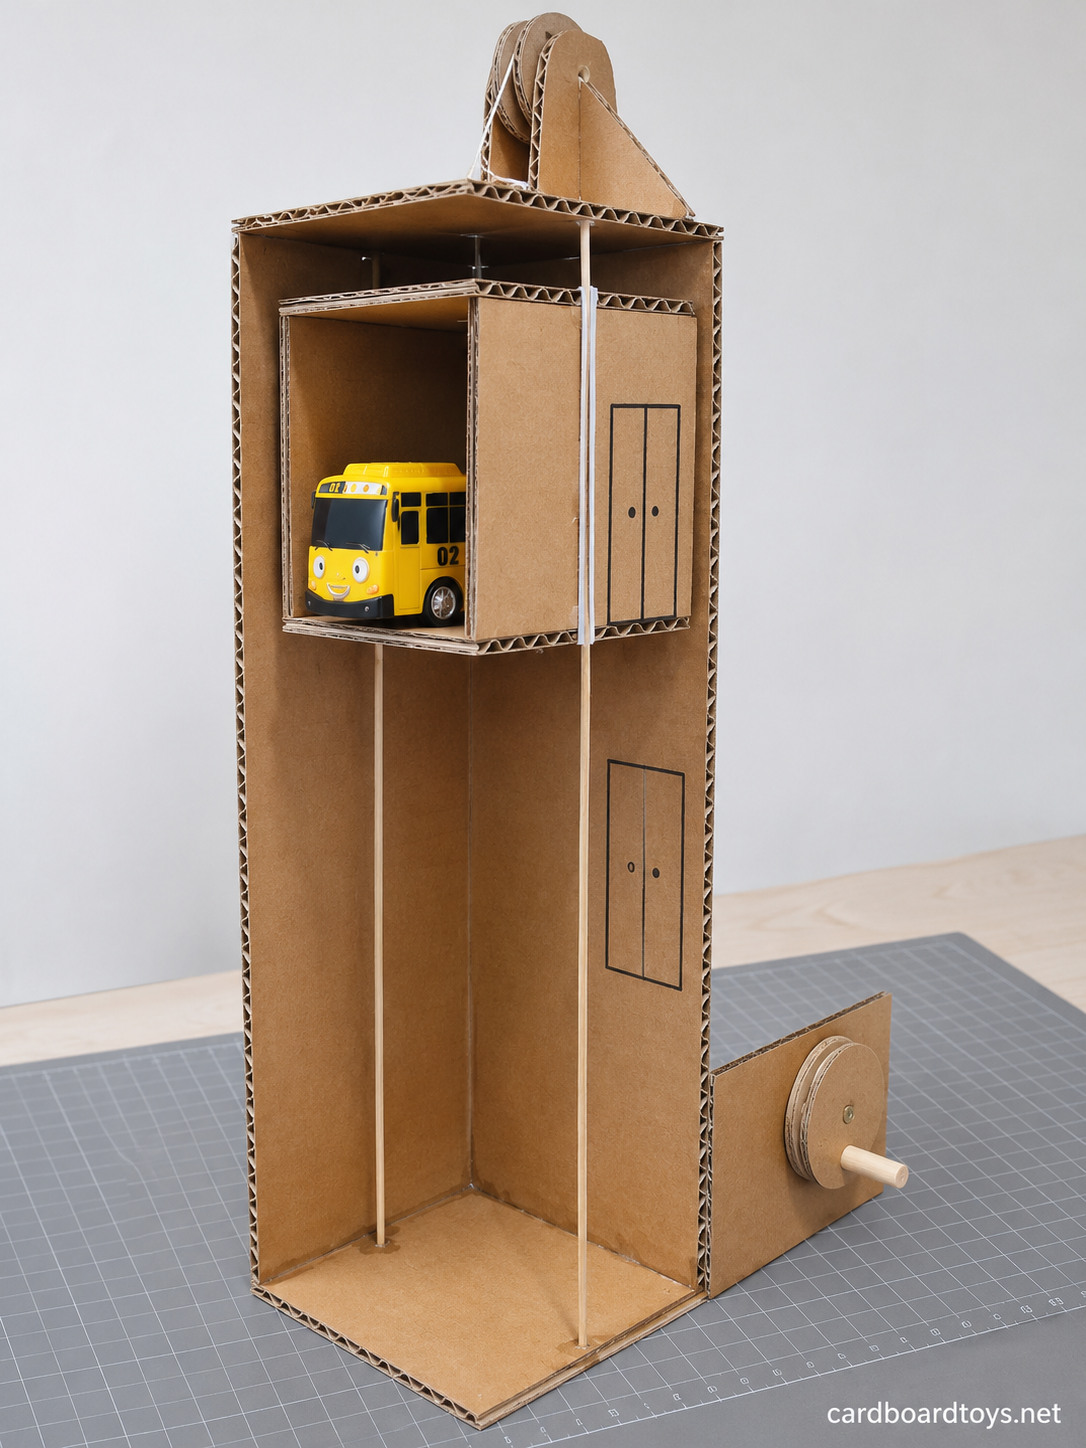
Put a toy in the car and turn the handle. The string winds onto the axle, runs over the pulley and pulls the car up the rails. Turn the other way and it comes back down. Draw some doors on the walls with the marker if you like.
If the car sticks, one rail is leaning. Straighten it and glue the base again. If the car slides down on its own, put a rubber band around the crank wheel and the side panel. The extra grip will hold the car on any floor.
Pin It for Later
Save the card below to keep all the sizes in one place for the next time a big box arrives.